Weapon Design Styles

In the much-belaboured “Headshots” thread, Telpe mentioned “flats” in reference to a weapon design.

As a larp weaponmaker, I’m interested in learning from other weaponmaker’s experiences. Hence this thread, where we can discuss each other’s designs and techniques.

This is not about My Design Is Better Than Your Design, but more about This is How I’ve Done It.

Skirmish Boffers

The first serious attempt at weaponmaking was the common-or-garden PVC boffer variety. We used closed-cell foam and cloth tape (silver for blades and black for handles) to create shortswords, longswords, javelins (non-thrown, long handles and short blade sections), and polearms. They lasted pretty well, but when we saw Scott Farndon’s and Kath Dewar’s “flat” swords, we were impressed and set about gathering the gear to make some.

Skirmish Fibreglass Core Weapons

We made a dozen or so longswords:

  • sail battons as our cores
  • closed-cell foam for blades
  • corflute for guards
  • thin pvc pipes wrapped in bike innertubes for the grip. A 150mm length of sail batton pokes out the bottom of the blade. This is inserted into the pvc pipe and glued using epoxy resin.
  • lead tape was used to fashion counter-weighted pommels
  • duct-tape was used to finish the sword (no latex); silver for blades, black elsewhere.

Since then we’ve updated our approach to longswords. Corflute is crap for guards - it bends and loosens. Instead we shifted to foam and finally foam-covered PVC pipes. I bought a beltsander and now we can make more blade-like edges to our blades. We have also forged our own pommel-counterweights from roofing lead, these don’t loosen as easily and are cheap to make.

Javelin blades are similar to swordblades, except they are short, wider and have serrated edges. Like swords, javelin blades are inserted into a pvc pipe that will serve as the javelin handle.
We’ve also recycled our old boffer swords by using the swordblade section as the handle. Existing boffer javelins had their blades cut off and replaced as above.

Most of our two-handed weapons follow the same design pattern as the javelin.

I managed to score two 12mm pvc rods that were a good length for a pole arm. I sanded down each end of the rods to make a flat paddle to which I affixed short swordblades. These double-ended polearms are light, rigid and manueverable, and were the signature weapon of Lord Obsidian, my longest lived Mordavian character.

I’ll put up some pics when I have time.

So, how have others made their weapons ?
My 5c:
I have been making LRP weapons since 1992, and used to take commissions fro Hamilton players for both weapons and costuming. I no longer have sufficent free time to do this, but make and maintain most of the QW wardrobe on a budget of almost nothing.

For PVC weapons I have always made tightly rolled newspaper quillions covered in copious amounts of insulation/PVC Tape. These are cheap and extremely durable if done correctly. As stated elsewhere, my first ever sword is still serviceable with it original (‘gem’-set) hilt and padding. At QW, we have always used closed-cell foam lagging which is thicker and softer than good quality camp-mat and is very durable with a cloth tape shell (if not covered, this is not durable at all and tends to deform with heat).

For flat, fibreglass rod and closed-cell foam weapons, sail baton off-0cuts make a great base for a strong blocking quillion. I have also make some really nifty basket-hilt rapiers out of sail baton, but generally found that sail baton results in a weapon that is really too flexible to block effectively with (dagger length seems to be the maximum useful length for this type of support).
Alista and I have both also experimented with heating & bending PVC pipe, with some interesting results. Early on (early 90’s/late 80’s) one of our regular players made a ‘katana’ by this method. I think he heated his pipe with boiling water. Another method is to heat you pipe by hlding it above you stove element - I have used this to make light-weight large frame-works for larger creations.

I personally always liked an old-fashioned a straight-razor for shaping the foam, but be careful who you let use one if you have one as they are really weak against a twisting action. Some people shape their foam with an orbital sander - wear a mask if you do this and don’t get the debris in you vege garden. Ados F2 or similar adhesive is a staple for foam & fibreglass weapon creation. to err on the side of caution, QW has always recommened that all fibreglass be wrapped with a spiral of tape to help contain the glass fibres in case of accidental sword breakage. In over a decade of LRPing, I do not think we have had this instance arise, however (we once had a player deliberately shatter a PVC sword;against a tree, I think; but I won’t go into that).

For hilts, I have always preferred leather-wrapper, or string wrapped. for string wrapped, you need an interwoven counter-thread. We have some weapons with this type of grip in out common pool if any of our Auckland based players are interested.

I’ve made weapons out of lots of stuff.

My experience with sail battens is that there are lots of different weights of batten. Your average trailer sailer sail batten is too light for long swords, but some of the cross sections I’ve seen were 30mm x 12mm !! That’s Solid !!

If you want to do curved swords (scimitars, cutlasses etc) try and pick up a kids fiberglass bow. Chop it in half at the handle and you have two pieces of fiberglass with curved tips. These make fantastic thrusting weapons.

Fiberglass is nasty stuff if you want to cut or shape it use a mask and do it outside.

I just heard on the radio that the A&P Shows / Field Days are on at the moment. Go along and grab a complementary cattle prod. They’re about 8mm fiberglass and about 1000-1100mm long which is perfect for a bastard sword…

My [color=red]HOT TIP[/color] on fiberglass cores is to stick a bit of garden hose over the tip. It eliminates punch through almost entirely.

Another very good core for staves is aluminum tube. Again, garden hose over both tips and you’re away.

I’ve often used silver fabric rather than silver cloth tape, mainly to keep the weight down.

Derek is 100% right about using masks when working with fibreglass. I cannot emphasise the importance enough. Disposable glove can be a good idea too.

This is how 90% of our swords are made:

The materials:

A fibreglass stick or something similar for the core. (We use something called GFK from plane models)
Some thin leather.
The right foam (camping mats are crap) use something with a density of 33kg/m³ or 45kg/m³ and a thickness of 10mm.
glue (Pattex)
latex
acryl paint
boat finish
a really sharp knife

Let`s get started:

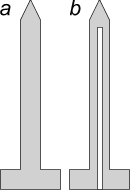
  1. Draw the desired shape of your blade + hand guard on a sheet of paper. Mark the shape of the core in the blade. Keep in mind, that there should be a least 20mm from the edge of the core to the edge of the blade and at least 30mm from the core to the tip.

  2. Cut it out and outline it on the foam. You will need three similar parts. You will also need 3 parts for the sword tail. The sword tail is made similar to the blade and will not be mentioned till the end of this tutorial.

  3. Cut the three parts out of the foam.

  4. Take one of the three blades and cut out the part where the core will be.
    a) basic shape
    b) blade with cut out part for the core

  5. Cut the core to the appropriate length.

  6. Cut two pieces of leather that almost fit the sword tip and glue them to the two remaining blades. Because of this, the core will be saved from coming out at the sides.
    The leather will be inside the blade later. It is also wise to strengthen the hand guard with a stripe of leather. (Dont use anything solid in the hand guard! Its really dangerous.)

  7. Glue the middle blade and an outer blade together. Make sure the core still fits in the gap. The better the core fits, the better the sword will be.

  8. Glue the core into the gap. Make sure it is real tight. Then glue the remaining blade on top.

  9. Let it dry (be patient)

  10. Sharpen your blade. That is the really tough part. I would advise to make markings where to cut. Cutting with a knife is a hard job and you will probably get notches in your blade. I heard you can also use a hot wire or a grinding machine for that. I had good results with an electric bread cutter (look after your fingers!). You can also craft some markings into the foam with a soldering iron or a knife.

  11. Mix a little bit of latex with paint (acryl) and put it on your blade with a brush (or your fingers… I use an airbrush, you can thin latex with water). Don’t use to much latex at a time.

  12. Let it dry.

  13. Repeat steps 11 and 12 six to ten times.

  14. Paint the boat finish over the latex.

  15. Let it dry for a week.

  16. Now you can put some weight into the sword grip with a lead band if desired. Roll some foam around the grip and finally you should glue some leather around it.

Happy crafting.