#Make your own cheap armour - Brigandine style
By Idiot/Savant
15 October 2012
Need some good-looking armour for a game? On a budget? Fortunately, there’s a solution: brigandine.
Brigandine is armour consisting of overlapping metal plates riveted to a cloth or leather outer. Its suitable for most fantasy games, and many late medieval historical ones (but as always, check your game rules / style guide / GM first!). Real brigandine was used by everyone from knights (in the early C14th) to footsoldiers (in the C15th and onwards), and went through a number of different stages and designs. Patterns for it are available online, and there is an illustrated how-to for a shaped coat in steel and sailcloth here.
For larp, we don’t need real brigandine. Larp armour needs to look the part, but doesn’t need to actually protect us. So we can dispense with the steel and replace it with lighter, cheaper plastic. For simplicity, we can also dispense with a historical pattern, and go for something like this: non-overlapping square plates riveted inside a side-buckling sleeveless tunic. All-up, this basic design should cost less than $50.
##What you need
[ul]
[li] ~2m of thick fabric for the shell. Durasuede is perfect, and can often be found cheap on TradeMe[/li]
[li] 8 - 10 plastic buckets ($1 each at your local supermarket)[/li]
[li] 400 - 500 single-cap rivets (~$20 from GDL)[/li]
[li] 6 small leather dog-collars (~$12 - 15 at your local $2 shop)[/li]
[li] heat-gun [/li]
[li] leather punch [/li]
[li] rivet anvil[/li]
[li] steel ruler[/li]
[li] craft knife[/li]
[li] scissors[/li]
[li] hammer[/li]
[li] ballpoint pen[/li]
[li] vivid marker[/li][/ul]
##Making the shell
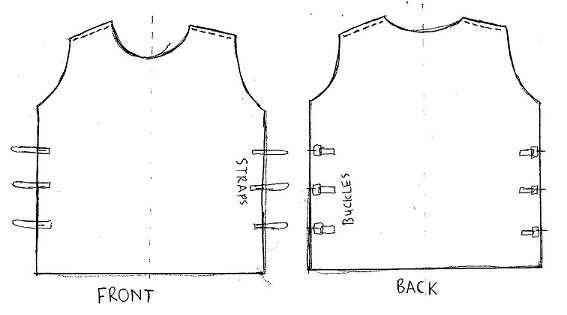
I can’t sew, so I outsourced this bit. But what you need is a straight-sided sleeveless surcoat which goes to about groin-level - something like this:
My costumer used the Simplicity 4942 pattern cut to length for the front and back to get the shoulders and armholes right. My one was lined, so it didn’t get stitched together until the last minute. If you’re not lining it, then you might as well stitch the shoulders together and hem the edges at this stage. Don’t stitch the sides together; you’ll be putting buckles there later.
##Design (1 hour)
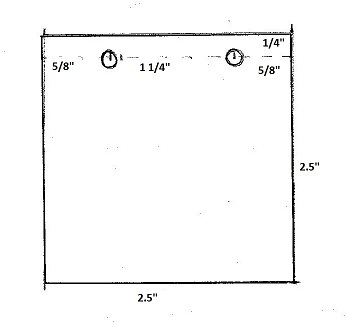
The armour will consist of 2.5" squares, riveted to the fabric. The rivets are spaced to give a rectangular grid on the outside - approximately 1.25" horizontal seperation, and 2.5" vertical. The bottom row should be slightly taller - 3" - so it can be riveted at the bottom as well, but that’s not strictly necessary.
So once you have your outer, you need to work out how many squares you will need. Lay it out flat, mark a centreline on the inside, then start at the top and work your way down. The general pattern is stacked rectangles: a big wide rectangle on the bottom, with a narrower one on top to cover the upper chest while giving room to swing your arms. In my case, this meant the top two rows were six squares wide, and the bottom 8 were 10 squares wide. The back of my pattern has a higher line for the collar, so it will have an extra row of 6 squares. Draw lines horizontally to mark the rows; later you’ll draw vertical lines to show you where to put the rivets.
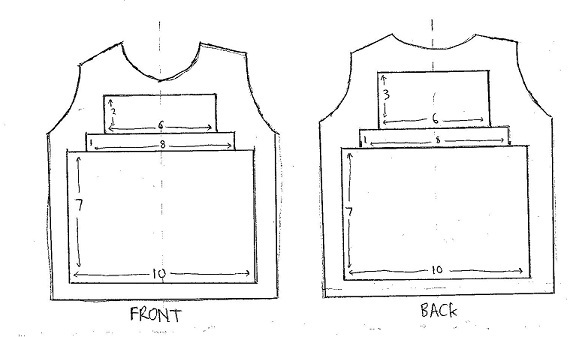
Remember to leave enough room around the arms; you don’t want the armour catching as you swing a sword.
##Cutting the plates (3 hours)
The next step is to actually cut the plates. First, you dismember the buckets into the largest pieces you can. In my case, this involved cracking the rim off (it was weak), trimming out the holders for the handle, then cutting down vertically and then around to remove the base (you need to be careful to manage the stress here and avoid cracks). The result was a pile of half bucket-sides.
Flatten the half-buckets out by blasting them with a heat-gun. Note: heat guns are dangerous, so don’t start a fire. Wear thick leather gloves to do the squishing with, and to avoid burns. Also, plastic gives off fumes when heated, so do this somewhere well-ventilated.
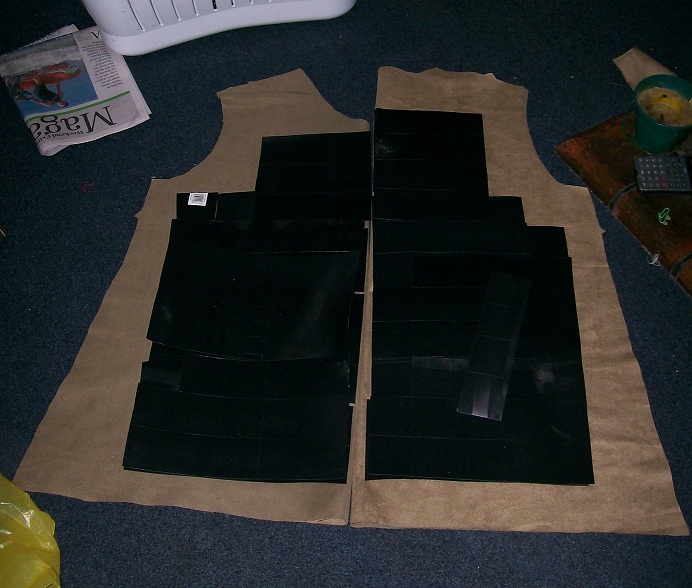
Next, mark out the squares, using a ruler and craft knife. Cut away the excess plastic, but keep things as large blocks for the moment. Why? So you can double-check your design:
This shows the front (L) and back ®, folded in half, with the squares (still grouped in the chunks they came off the bucket) laid out to show the pattern.
Once you’re satisfied that everything is in the right place, cut them up with scissors. Using a cardboard template and a vivid marker, mark where your rivet holes need to be, and punch them. This will take about an hour, but you can do it while watching TV.
You should make more plates than you need, as some will split during punching.
##Riveting (6 - 8 hours)
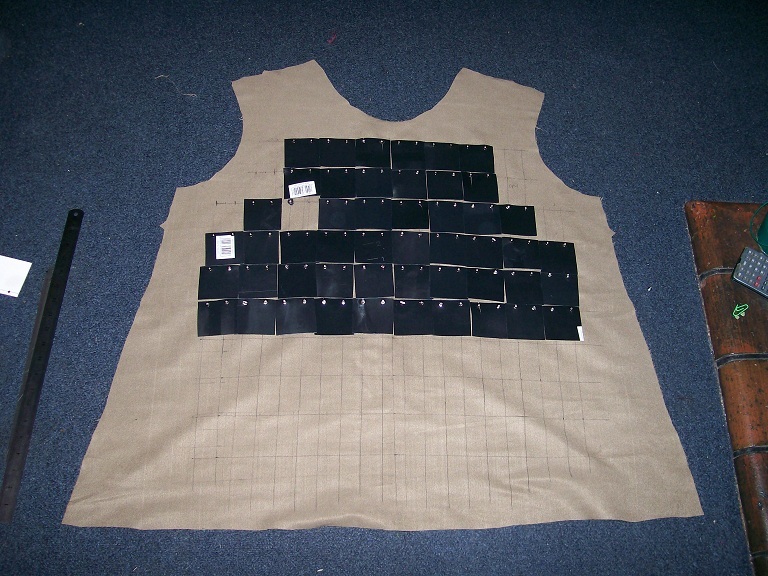
Go back to your outer and mark the rivet positions. I did this by drawing long, vertical lines 1.25" apart. Then its just a matter of punching a couple of rows at a time with the rivet punch, flipping it over, riveting the plates in, and repeating until you’re done.
Halfway there on the front. The gap was where I mangled a plate and had to take it out.
##Straps (1 hour)
At this stage you should have a sleeveless, straight-sided surcoat with plates in it. Now all you have to do is stick it together. You’ll need about three straps per side, ideally equally spaced. The ergonomics are somewhat individual, but I wanted the long end of the strap on the front, and the buckles on the rear, so it would be slightly easier to do up by myself. I also tried to line up the buckle with the edge of the fabric. Once you’ve worked out where you want it to go, then its just a matter of cutting the straps in half, punching some holes, and riveting it in. Don’t try and rivet it through a plate, since that will just make a mess.
(in fact, you can do this at the beginning if you’d prefer; the reason I didn’t is because of the lining, which involved sewing another layer of fabric to the inside, then turning the whole thing inside out before hand-stitching the bottom. It was a pain, and is completely optional).
##The completed article
Congratulations! You now have your very own armour! Which should hopefully survive the rigours of combat!
You’ll find that sometimes the plates get caught on one another; just give it a good shake, and they’ll come right.
Obviously, you can use the same method and materials to make more shapely brigandines. Or a Wisby coat of plates.
