How do I make a corflute shield?

[quote=“Ryan Paddy”]In terms of looks, I’d favour not having the back be white. The back of shields often seem to feature in photos. Could be painted.
[/quote]

Yeah, good tip there. A great many people don’t bother doing anything to the back of the shield and it really ruins it. Theres nothing worse than see Barfoot & Thompsen or Ray White flashing around.

I find a good thing to use as a primer is ADOS. Either spray or wipe on. Let it dry and its a fine paint surface. It can also be used to give some nice texture.

Haven’t tried ADOS yet, but a layer of latex works OK. I wouldn’t use it on the front of the shield because it will get damaged, but it should be OK on the back of the shield.

So, what’s the best way to waterproof the paint on the back so it doesn’t run? Any useful spray I can use?

(Currently doing a 60cm Frankish roundshield)

As long as you’re using acrylic paint and not poster paint it shouldn’t run in the rain once it’s dried.

They’re labelled arcrylic (“Derivan student arcrylic”), but past experience indicates a problem.

I would use polyurethane, but that’s because I have some around for using on the house. You can get water based polyurethane these days, makes it easier to wash the brushes, and doesn’t go yellow with age.

Where can I get this useful substance? Mitre 10?

Yep, any house-paint shop should have it.
EDIT : I’ve been thinking about this a bit more, and like PVA glue, polyurethane works best on wood and other absorbant materials. So it may not stick to corflute plastic well.

[quote=“Hannah”]Yep, any house-paint shop should have it.
EDIT : I’ve been thinking about this a bit more, and like PVA glue, polyurethane works best on wood and other absorbant materials. So it may not stick to corflute plastic well.[/quote]

So not so good for the back then. Shoudl work great on the face, though, which is covered in cloth.

I recommend covering both the front AND the back of the shield in fabric and painting the fabric with test pots of paint ($5 from any hardware store).

The best places to get Corflute for FREE:

  1. nick the nearest “HOUSE SOLD” sign. Wait till it has a SOLD sticker on it or people will get upset.

If you don’t want to nick it:

  1. Go into a real estate agent and ask for any used signs.
  2. Bottle stores. They tend to have heaps.

I have also had luck getting foam mats for free from water parks that use foam mats for hydroslides. As long as you don’t mind having the edges a bit tattered.

Notes: Try to have the ‘white side out’ (sign side in) even when covering with fabric or painting it.
Putting foam on the inside edge of your shield is a good idea. Especially at the top and the bottom point. You won’t like getting your shield hit into your face, specially with staples etc in.
If you have spell scrolls you need to read often, try taping them to the back of your shield. Several of us did this in Mordavia.

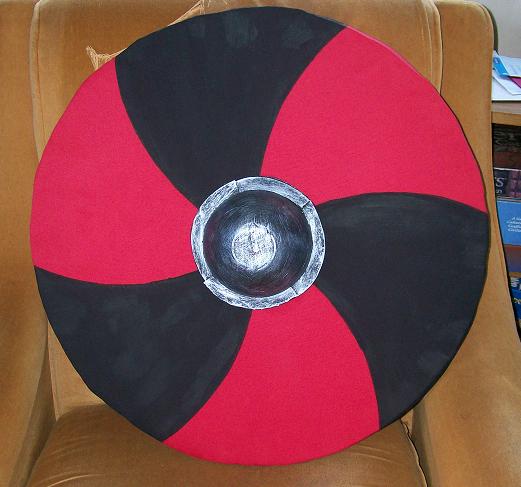
Removable fabric covers!
1: Put your shield down on a piece of fabric. Add the width of the shield plus about 3in round the edge and cut out around it.

2: Get a long piece of very strong string/leather (or make a narrow fabric tube) which should be about about 30-60cm longer than the circumference of your shield.

3: EITHER: first fold over the edge of the fabric by about 1 in and sew leaving a pocket, leaving a hole at one point for the ties, and spend ages threading the string through it;
OR: lay the string round the edge of the fabric, fold the fabric over it, and sew trying like hell not to catch the string in the sewing machine as well (but no threading needed!)

4: Both ends of the string should stick out the hole of the pocket (top, bottom, or side - wherever you decided to put it - I favour the bottom especially if it’s pointed)

5: Paint the front side of the fabric with whatever cool design you want. (The important step!)

6: Put the shield down (straps up) on the back side of the shield cover, and pull the strings slowly while folding the cover edges over the shield. It should gather on the back of the shield. Pull the strings tight and tie a knot that you will be able to undo later. Tuck the ends under the fabric.

7: Now your shield is covered in fabric with a cool design on. Make more with different designs! use this to change a shield you’ve already painted a design on, that you want to keep for another game! Now your one shield can do for any larp you want, with any design you like, and moreover you will get used to the heft of it and not have to change to a different shield you don’t know well.

Hadn’t thought of them. I’ll try that.

(Also try your local DoC office. They apparently have regular surpluses, and they know that corflute can be used for shields)

These are a fantastic idea, though they won’t work for anything with a boss (unless you come up with a “removable lockable boss” as well).

Latest effort:

Only 60cm, but it’ll do.

Okay, this is your best one yet. 60cm center-grip round shields are one of my favorites; there is nothing you can’t block with one of these.
The heraldry looks good as well. I prefer red with white, or black with white, in preference to black with red, but it looks good: :smiley:

I’d reach for this shield in a fight, very happily.

Next time you’re in town, I’ll show you some tricks with it. These shields are vastly better than the ones with straps on your arms.

And the whole diameter fits on a single sheet of corflute, meaning its quite efficient.

I don’t have white paint, and the first stray cloth I came across was red. Next one will use a white base (of course, I need two).

Viking shields are meant to be 80cm or so; is there any advantage from going bigger?

And Spotlight.

IMO - only if there is more than one archer.

after seeing this

google.co.nz/imgres?imgurl=h … m=1&itbs=1

i was wondering if anyone knew how to make those lines on the shield bulge out

Probably the best way to achieve this would be by casting a latex covering for your shield.

Typically to cast latex props you make a positive in clay (by shaping it with your hands and tools), then cast a negative in plaster from the clay positive (make a box, put liquid plaster in it, press the clay positive down into it, remove the clay when the plaster has set), then cast a positive in latex from the plaster negative (in this case probably by pouring liquid latex into the plaster negative and letting the latex set with a flat top, so that it can easily be glued to the shield).

Then you glue the latex covering to the front of the shield with contact adhesive.

Bryn and Norman in Wellington made some shields this way I think, with a wood-look surface cast in latex. They glued them onto curved shields made most of foam, very nice result, and there are instructions somewhere. The nice thing about casting is that once you have the negative, you can cast more copies fairly easily.

Click here for Bryn’s description of how they made their shields.

Thanks
that should do the trick

i will tell you guys how it goes once i get the rest of the materials