How do I make a corflute shield?

I have recently acquired a stack of corflute real estate signs. So, how do I turn them into shields? How many layers? What do I use as strapping? Where do I pad? what other stuff do I need?

I am primarily interested in heater shields (since Dark Hart of Camelot is on the calendar, and we will need at least two for that). But knowing how to make a gold old fashioned Viking roundshield would be good as well (yes, I have seen the shield boss pattern for that).

Please post here and document the technique for the community.

For a basic flat sheild i beleive the usual method is 3 layers. Each layer layed on top of each other at 90 degrees to each other (so that the internal ribs of the corflute run like up-down then side-side) like ply board…beyond that…

Mike? Derek? Gaffy? Someone? You want to handle this?

I personally prefer a center boss shield for larping, which doesn’t have straps. It has a handle and a boss. They’re slightly more work, but I think they’re worth it.

However, if you want to make one with straps, they’re easy enough…

I prefer a heater about 600mm x 600mm, and I use it rotationally for blocking my legs. This means that instead of lowering the bottom corner, I rotate my arm, like a karate block, and use the corner that has my fist behind it to block. Most people don’t block like this, they just hang the shield in front of them like an pizza advertising sign. But it works for me :smiley: It’sa very natural way to use a shield, all you have to do is try to move your fist into the oncoming weapon and the shield works.

I’ve marked a diagonal line on the shield, which represents the center of balance if hung from the corner. I like to put my arm along this line, because it gives the shield a very neutral balance. I see other people who strap their shields with 1/3 of the mass above their arms and 2/3 below and I hate using them. Again, this is a personal thing, but if you’re asking how to strap a shield, you probably don’t have a strong preference, so I recommend you do it my way.

I tip the angle of the strap for the hand slightly forward, for comfort.

Pretty much anything will do for strapping. An old belt or strips of leather are preferred. I like to use 3-4 layers of corflute. Always put the ugly advertising inwards, so you have a pretty white surface on both faces of the shield.

Glue all but the last layer of corflute together. cut slots through the sheets and poke your straps through. I like to have buckles on the outside, so you can adjust the tightness of the straps. This’ll allow you to get them nice and snug, which gives good control, wearing either nothing on the arm or armour.

Glue the other (front) face on.

Clean up all the edges with a craft knift.

Run heavy duct or gaffa tape arounnd the edges to keep them all together

Glue light fabric over the front of the shield, wrapping over the edge and onto the back of the shield. This gives you a nice surface to paint and it also stops the shields chewing up peoples nice weapons.

Then paint it, because paint hides all our sins and makes the shield look fantastic. :smiley:

I would highly reccomend not just leaving a corflute surface like that - the edges can be damn hard if you catch somone in the face.

I use 3 layers of and like Derik I glue 2 together then use the 3rd as the outermost - as above.

However before painting / attaching material I put a layer of medium density foam on the outside and on the edges of the shield.

The edging reduces risk of damage to other people and the face of the shield reduces damage to both other peoples weapons and helps give the shield a stronger feel as people tend to like to hit shields harder it also increases the duribility of the shield.

From then you have a couple of options - Latexing and painting is one for a metal / wooden effect or just simply cover with cloth depending on what you are trying to achieve.

I think if we are trying to get more mainstream it might be time to start putting in recognised safty standards to our weapons.

[quote=“Xcerus”]…However before painting / attaching material I put a layer of medium density foam on the outside and on the edges of the shield.

The edging reduces risk of damage to other people and the face of the shield reduces damage to both other peoples weapons and helps give the shield a stronger feel as people tend to like to hit shields harder it also increases the duribility of the shield.[/quote]

Yeah, good point. Most of the shields I make (like all the round shields for Hamilton) I glue on 6mm strips of EVA foam (camp mat) around the edge, for all the reasons listed above. Just cut out lots of straight strips and glue them around the edge. You don’t need to cut bent bits for corners (saves on foam) because they will bend to shape easily.

Just spray paint them black and dry brush them silver to make them look like metal edging.

Thanks - some good info there (particularly about the edging). For strapping, I was planning on going diagonal, and trying the method linked from Bryn’s old post: finding the centre of mass and putting my elbow there.

Next questions: How big should a heater be? What sort of glue do I need?

[quote=“IdiotSavant”]Thanks - some good info there (particularly about the edging). For strapping, I was planning on going diagonal, and trying the method linked from Bryn’s old post: finding the centre of mass and putting my elbow there.

Next questions: How big should a heater be? What sort of glue do I need?[/quote]

A lot of that is personal preference, without really having any wrong answers.

Some games limit size, or you must pay extra character points if they’re over a certain size. Dart Hart of Camelot isn’t one of them, but Wolfgangs is.

I favour 600 x 600, or smaller (500 x 500) but I’m unusual in that I move my shield a lot. For beginners, who are typically focusing 90% of their brain on the sword, bigger is often better in the short term.

I think a typical corflute sign is about 600 x 800, and you’ll find you’re pretty safe behind one of them. The proportions are also reasonably pleasing.

I use Bostic or ADOS F2 (contact adhesive) and that works really well on corflute and campmat.

Re glue and campmat - you’ll want to do two coats on the foam to get it to stick properly, otherwise it will peel off. LEt the first one get “tacky” per the intructions, then do the second and the layer on the fluteboard.
Also, don’t be tempted to “roll” it on, try having it down flat, and laying the fluteboard down on top. Otherwise the foam gets stretched and distorted.

[quote=“TequilaDave”]Re glue and campmat - you’ll want to do two coats on the foam to get it to stick properly, otherwise it will peel off. LEt the first one get “tacky” per the intructions, then do the second and the layer on the fluteboard.
Also, don’t be tempted to “roll” it on, try having it down flat, and laying the fluteboard down on top. Otherwise the foam gets stretched and distorted.[/quote]

I always “roll” mine on. I like it being stretchy and distorted :smiley: That’s how I get it to go 'round curves.
Each to their own :wink:

on the face I tend to lay it on - for edging I roll it on :wink:

There’s lots of good advice here. Some comments:

[ul]
[li]Edging a shield with closed-cell foam (e.g. camping mat) is a good idea, especially if it is 3+ layers of corflute. I have a bunch of shields that are only 2 layers thick, and have had no problems with the edges simply being taped.[/li]
[li]Before edging, consider taping the edges to provide a better surface for the foam.[/li]
[li]Paint does not stick at all well to corflute (I haven’t found a primer that works well either), so gluing closed-cell foam or material is a good way to get a better finish.[/li]
[li]The wrist/hand strap needs to be a snug fit for better control. However, this means a hit on the shield where your hand is could hurt, so I suggest putting some foam on the back of the sheild to protect your hand.[/li]
[li]Use leather or similar for the straps rather than strips of corflute. I have seen a few sheilds that use corflute straps, but as soon as it tears, the sheild is useless and very hard to fix.[/li][/ul]

Given that the material you’ve got is corflute, I imagine that’s what you want to make the shields in.

But in general, just using closed-cell foam is another option.

I used just foam for two heater shields that were used at Camelot (the white with red cross and the gold), and those shields work well. The two main advantages of foam-only construction are that you can curve it easily and that it’s very safe.

The $2 shop(s) often carry cheap dog collars ($2-3 each) which are ideal straps for shields as they already have buckles attached.

Now that’s a good idea (I was already thinking of getting a lead to use as a shoulder strap).

Right, now to raid some shops; I’ll let people know how it goes.

(Oh, one final question: where do I find the blessed ADOS glue? Sounds like its a basic of larp prop construction…)

ADOS - available anywhere you would buy hardware guff - Bunnings, Warehouse, Mitre 10 etc.

For the most recent shield I made, I used Ados spray glue.

Usually spray glue is a pain in the ass, because most of it goes around what you’re spraying and hits something erlse.

But for shields, it’s awesome because they’re big wide things and hard to miss with the spray. You get a nice even coat very quickly and easily.

Right next to the ADOS F2, you’ll see less-famous brands of Contact Adhesive. A quick check of the ingredients will confirm that they are pretty much the same stuff, although at a lower price.

Also, you only need a thin coating on both surfaces. Wait until they are both tacky before applying, and remember you typically can’t change anything once you’ve put the surfaces together.

Lastly, I used to buy larger quantaties (i.e. > 1 litre) because of the cost saving. But for me it was a false economy as the glue would go stale long before I could use it all up.

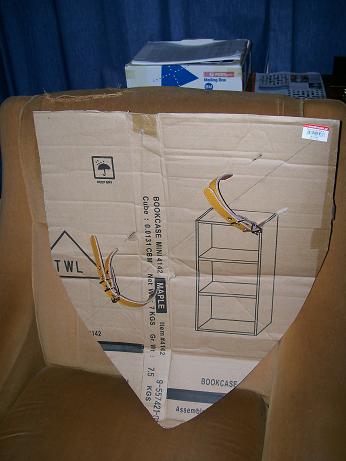
I raided town today and got some supplies: ADOS spray, a pair of $2.99 dogcollars (with fake “studs”, but they were easily popped off with a knife), 5mm EVA foam for the rim and face (expensive - ouch - and is that thick enough?). Then I started thinking about shapes and sizes. The SCA said “shoulder-to-shoulder by chin-to-crotch”, which seemed a bit narrow, so instead I went with a straight 21" width and the 3:1 pattern used here (that’s an excellent page BTW, even if they’re using wood; check out the scabbard project…) To get an idea of how that worked in practice, I made a carboard mockup:

Which also let me get an idea of where the straps should go so as not to expose my shoulder. Having tried it on and tried a few blocks, its nice and maneuverable. Though I worry whether its long enough…

One problem is that the dimensions (530 x 650 mm) are just a bit too big to fit both ways on my corflute sheets, which means I’ll need to do it in two parts in order to cross my corrugations. But that doesn’t seem too difficult.

Tomorrow I’ll start cutting and gluing. Which means hopefully I’ll have something in time for combat practice on Sunday.

Ryan, can you tell me more about the construction of shields using just the Foam? I find cornflute hard to find so this sounds like an interesting option.