
I think the point about hanging it is to ensure that you are manipulating the shield about its centre of mass, to minimise the effort required.
Yup. You don’t usually do it for a centre-grip shield however.
I don’t have it, it’s in the NZLARPS gear.
But for a boss shield the grip is central and vertical. I.e. hold your fist out like you’re doing rock-paper-scissors, that’s how you grip the shield.
[attachment=0]shield.gif[/attachment]
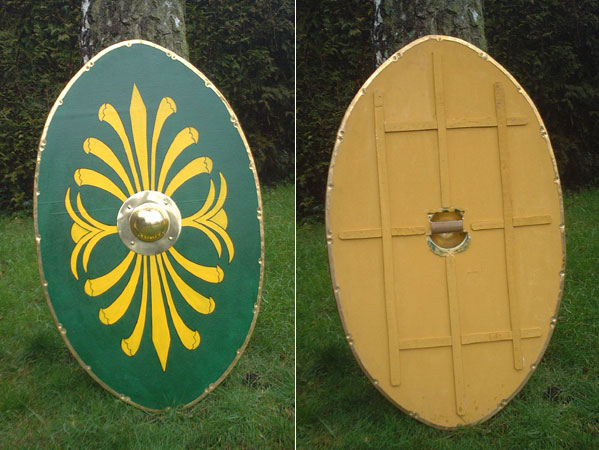
That’s an oval tower shield, the white line is the grip and the black circle is the inside of the boss.
Just a note from my old roman re-enactment days, the grip on that oval shield is actually in the wrong position, for a shield like that it should be rotated 90 degrees so its east-west not north to south. the vertical layout will cause stress on the wrist and make it hard to maneuver.
You want to be careful with that, I think that would fall under most larps’ rule of “no grappling” because it involves intentionally messing with their balance and limbs.
[quote=“Anna K”]You want to be careful with that, I think that would fall under most larps’ rule of “no grappling” because it involves intentionally messing with their balance and limbs.
[/quote]
Will do. In all likelihood, it will be mostly fending off rabid crew with no chance at an illegal combat move. 
I know from experience the crew tend to just whack and get whacked.
Right, got all the stuff minus the Ados -.- mitre10 shut 10 mins early.
Going to start mock-ups with some cardboard to get a better idea of what people are suggesting. 
oh btw, no one has really commented on the shapes I appreciate feedback, I’d rather not have to make them all. 
The shield shapes at the top are heraldic shield shapes that weren’t really used for combat. Some are ‘ecranch’ (sp?) type shields that were affixed to the breastplate for jousting, not the type of shield that is used for foot combat.
If you want a shield that is competitive (i.e. functions really well) you’ll run with something like the oval shield which is historically what was used when armour wasn’t very good.
Historically, most large shields (Roman or Greek) did have a horizontal hand grip, but it’s easier to do a vertical handle if you want to use a fibreglass rod for your grip as you won’t be able to curve the shield if you do it horizontally.
Large oval shields are very effective. They are very hard to get past.
[quote=“Derek”]
The shield shapes at the top are heraldic shield shapes that weren’t really used for combat. Some are ‘ecranch’ (sp?) type shields that were affixed to the breastplate for jousting, not the type of shield that is used for foot combat.[/quote]
So the ones I’ve drawn would be more as a show piece, for guards around a palace type deal? And best to stay off that unless the event calls for display?
I’m wanting something that is comfortable to lug around and is useful when it comes to actually being used. So ideally what I’m reading is that a more radial coverage shield with less corners is what I should be thinking about? With that in mind I’ve been reading/watching more stuff about shields & combat… so something more like this is what is being said (now am I right in assuming the handles the right way considering people’s comments?):

Circular shield is 500mm, the oval there is 1.5 the height, 750x500mm - based on available materials since 600mm are no longer standard width 
That said, I got some 500² EVA tiles while poking my nose into Look Sharp in Onehunga and they seem a reasonable size.
Also got some material for the T tunic while I was there. ^.^
The hoplite style is what you went for with Oasis isn’t it Derek?
Did you round the shield so the whole thing was convex or just the boss?
The Viking shield is a flat circular board with an attached handle where as the greek style was almost like wearing a large bowl on the arm.
I’m inclined toward the bowl because that will fit with my character’s channelling as the shield will double as the ritual kit (ideally) - more on that later.
I find these shields very convenient to lug around. They take a second to pick up and put down, which is faster than shield straps. I often just put a 1m circumference leather loop through the handle and hand it on my shoulder like a shoulder bag. It leaves both hands free and is easy to move to your hand if needed.
[quote=“Kharnak”]The hoplite style is what you went for with Oasis isn’t it Derek?
Did you round the shield so the whole thing was convex or just the boss? [/quote]
Oasis’s shield isn’t a hoplite shield (but it should be). It’s pure fantasy with a bit of inspiration from some Persian styles.
[quote=“Kharnak”]The Viking shield is a flat circular board with an attached handle where as the greek style was almost like wearing a large bowl on the arm.
I’m inclined toward the bowl because that will fit with my character’s channelling as the shield will double as the ritual kit (ideally) - more on that later.[/quote]
Making convex shapes is more work than flat shapes. Viking shields tended to be flat and the curved Greek and Roman shields tended to be curved but not convex like a bowl.
The hoplite shields are one of the few styles that were truly convex. Persian styles being the other main style that springs to mind.
Beautiful pictures by the way. Really very nice 
The handle is the way I’d build it. I normally end the fibreglass handle 100mm from the edge of the shield. Not for any especially good reason
I’ve found the below picture while reading some replica stuff (wood) here.

That style would mean cutting hollow loops and stacking them up.
This would likely mean the fibreglass rod would extend from one side to the other if I were to do it that way, thus the whole shield is the “boss”.
This is the hoplite one that I’ve been looking at. But what I’m probably going to do is the Viking style with a bit of a curve back, sort of bridging the two styles.
So as seen on the right in my previous post’s image.
Alrighty! goes off to look at yet more shield styles
Persians adopted the Hoplon from the Greeks, seems the Indians borrowed from the Persians.
Dhal Shield
Dhal Shield
Or smart people just like round things 
And a good site that shows the Dhal up close from a few angles.
I really like the external knobs, they would help stand it up if flipped to look like a bowl.
Found a site selling Greek Shields.
And also lots of other stuff including Roman Shields!
And Viking.
Only problem is not seeing the back and sides, which really helps for visualisation. :
Oh I take that back! you just have to click an item for further details including other angled shots!
Alas this is only true for some items 
At the very least I have some more ideas and insights. Plus anyone else interested now or later will have somewhere to go looking.
If you want to make a Hoplon / Aspis, there’s a how-to here:
greece.board-directory.com/t15-hoplite-shield
There is a link to pictures further down that thread.
You’ll probably need two big rolls of camp-mat for this, plus latex and paint. but the result is amazing
I was going to bring in this Viking shield from Epic Armoury, but unfortunately they were out of stock:
medievalcollectibles.com/p-7 … hield.aspx

Luckily the photos there show several angles, including the back. You can see that they’ve managed to get a nice convex shape on the front:

There are a couple of ways you could achieve this. One is something like the excellent guide that Idiot posted above, which involves taking a circular piece of foam and cutting wedges in it, then joining them, so you get a convex shape. Much like how Derek’s shield boss is constructed.
The other option is heat. If you had a nice former in the shape you wanted the shield, you could lay a circular piece of foam on top of it and heat it up gently with something like a heat gun (used for stripping paint, blows hot air). In theory, the foam would soften and gradually settle into the 3D shape. Of course, this could be a tricky process in practice. But open-cell foam really does become malleable under heat. Best done outdoors for ventilation. The same technique could be used to make bosses - and it would probably be easier to find a suitable former for them, as many bowls would suit. Lay the bowl upside down (curved side up), rest the foam sheet on top, gently heat, and gravity will cause it to settle over the bowl shape as it softens. The softening process may cause deformations in the surface if it’s not even and mild though.
Note the back of that shield:

First off, that’s an excellent picture of a rod grip. But also, note that the back looks mostly flat, even though the front is convex. I think they’ve fitted a flat back to a convex front, in order to run the rod through the back section without it “floating”. There is probably a hollow gap between the back and front, with some foam supports in it at regular intervals, and a solid foam support running through where the rod is. A nice design trick.
The finishing on that shield is superb too. But I actually love the finishing on those historical Persian shields you linked to:

If you could achieve something like that it would be really attention-grabbing, but of course that’s mostly about the detail in the artwork, the fine detail that would be required if you wanted to have protruding details laid on like that original, and the quality of the metallic paint job.
If you did want really fine detail on the front of a shield, the best option would be to make a clay positive, then a plaster negative mold, and then paint latex into the plaster negative. This will give you a detailed latex “skin” that you can glue to the front of the shield, which will also cover any imperfections in the foam. The added advantage is that you can make multiple copies from the same plaster negative, to have several matching shields.
My one experiment with this so far hasn’t been successful. But I should try again sometime.
Also 50cm is quite small, I think. 70cm or more would be more practical?
That’s another can of worms I’ve yet to even pick up to look at off the shelf But probably worth a try in future. As it’s my first attempt I’ll do what I can with the foam.
Thanks for the tips as well. I’ll try the bowl thing see how it turns out.
That’s another can of worms I’ve yet to even pick up to look at off the shelf But probably worth a try in future. As it’s my first attempt I’ll do what I can with the foam.[/quote]
Hot glue is another option here; one of the foam armour tutorials uses it to create raised lines for detail. But its probably too fragile to use in combat.
I did see that. And thought the same thing. Interesting concept though. I like the soldering iron grooves tip.
Yes… looking at people wielding them… it seems mostly to be from chin to knee. or shoulder to thigh. hmm. May need bigger mats!
I do recall someone in one of these shield building threads asking for thinner than 1cm foam?
There are yoga mats at Look Sharp which are 5mm and sized… 610x1730 oddly. unfortunately they only have these in pink
Para rubber in Mt Roskill & Mt Wellington are selling large sheets of EVA and other foam.
It seems they’re a bit more expensive than the warehouse bedrolls however.
The Warehouse camping mats come in bigger widths than 50cm.
Another plan update!

Now off to get mats from warehouse and bigger bits of cardboard for mock ups!