Your best bet are these. They’re by far the most durable and you can usually find them at mitre 10.
Carved the sandwich, then sanded it a bit. Its quite rough, but would look OK for carved wood, particularly if I texture it a bit more.
Also finished the first wrap of the other one. It definitely needs another layer - having given myself a few trial whacks, it feels like being it by a fibreglass rod. So I’ll thicken it up.
Next step: cut flanges and wrap the head.
Behold!
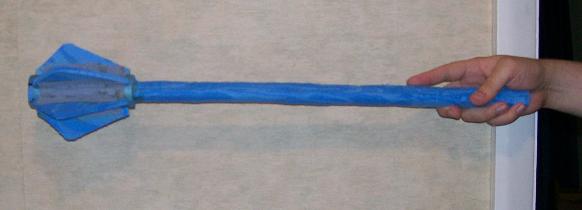
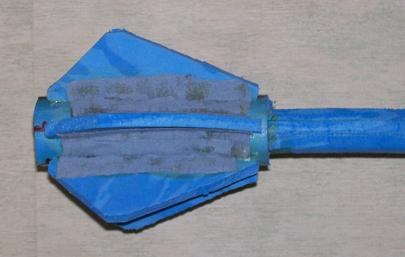
I’ve stuck the flanges down with cloth as well, but I have no idea if they’ll actually cope with combat. If they don’t, I could try stripping them off and sticking spikes on the base - but can you do that if its been latexed?
(For latexing I will try and prevail upon someone who actually knows how to do it. I feel confident carving and gluing foam, but not mucking around with toxic chemicals…)
[quote=“IdiotSavant”]Behold!
I’ve stuck the flanges down with cloth as well, but I have no idea if they’ll actually cope with combat. If they don’t, I could try stripping them off and sticking spikes on the base - but can you do that if its been latexed?
(For latexing I will try and prevail upon someone who actually knows how to do it. I feel confident carving and gluing foam, but not mucking around with toxic chemicals…)[/quote]
Looks good - realistically proportioned etc. Should look very nice when it’s painted.
Latex is pretty harmless. I mean, I wouldn’t gargle the stuff, but it’s not nasty. Just think of it as thick flexible paint.
Latex isn’t so bad. I’ve had it used on my face for make up effects, and so has Tigger when we did Tartarus the demon (us Wolfgang GMs take turns on being the monster-with-horrifically-painstaking-and-uncomfortable-make up) I also had it painted on my hand for a weekend for a creepy deformed look. The best part about having it on my hand was the fact it was cold and nasty to touch 
In retrospect, I wouldn’t recommend either of those experiences but I came off none the worse for wear. I wouldn’t worry about mucking around with latex, it’s probably no more dreadful than the ados. Don’t eat it and don’t get it in your eyes 
Here is me peeling my face off:

When using a product you’re not familiar with, there are always MSDS (material safety data sheet) available on the internet (if they didn’t come with the product themselves).
These give you an overview of how a product affects you and what precautions you should be taking to minimise potential harm while using it.
For example -
ADOSF2.
Your average liquid latex.
Places like the Glue Guru and Top Mark are great resources for relevant MSDSs.
They’re all free, and there’s nothing like being fully aware of the risks associated with working with dangerous chemicals.
If you used a polyester or similar plastic cloth in the sandwiched section, you could carve out your shape using hot knives. Old breadknives with bone handles, like people use for spotting, are really good.
I’d recommend using two knives so one can be heating while the other is being used to cut the foam. You’ll need good ventilation, because the fumes are acrid. Heating over gas is best (particularly if you can use a camping stove since you can take it outside for maximum ventilation), but if you need to use an electric stove, place an old tin can lid over the knives to reflect some of the escaping heat back over the knives.
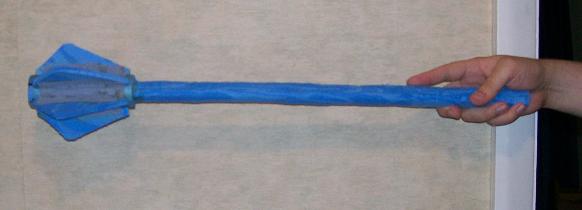
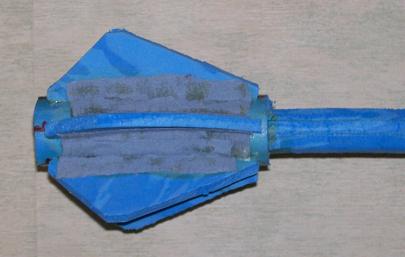
Number 2 mace, with wrapped hilt:
I think I prefer the first one - but the wrapped construction (2 layers of thin grey foam) is probably better for metal-handled weapons (I’ll get this one latexed in silverish, to match these)
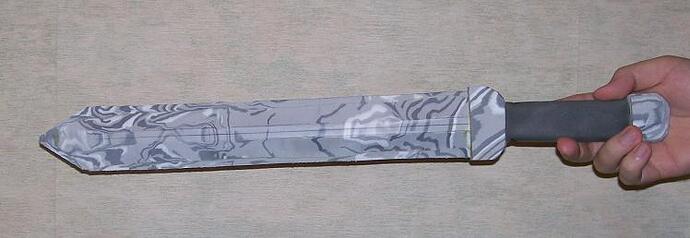
I also tried my hand at a bladed weapon. The original plan was a dagger, but I realised I’d used the wrong piece of core, so it became a (slightly too short) Gladius instead:
The blade-cutting is a bit rough, but it has been smoothed down a bit with a finishing sander (which is wussy, but the Warehouse didn’t have cheap belt sanders). And it’ll easily pass the ten-foot test.
Next experiment: axes.
Looks good.
The advice I’ve read on constructing axe heads is that you first tape a single piece of foam edgewise to the core, then form the head by gluing foam to that piece. Glue alone won’t hold an axe head on, because it suffers a lot of shearing force.
What if I make it in one sandwich with the handle? Though that only works for certain types of axe, I guess.
Nice work, they look very usable.
Another option is to use epoxy resin (aka bog) to extend the width of the core. I prefer non-round cores for axes because a round core enables spinning around the core. If your handle is pvc, then consider heating and flattening the end of the handle to provide a flat base for the axe head (i.e. no need for a fibreglass round core).
The larger the “paddle” at the end of your axe-handle, the more secure the axe-head will be.
If you make an axe head by just gluing layers of foam to the handle/core, the head is likely to come loose from the rotational force that’s exerted on the head when used. I’ve seen that happen, and read what I suggested as a solution, but I don’t think I’ve tried it yet.
I was thinking specifically of making haft and head in one block, rather than seperately. But if something goes wrong, I guess it means a messy tear at the weak point, rather than a break along the glue line. Tape and cloth reinforcing seems to be the way to go.
Headwise I was thinking something Viking-style (e.g.) - but I guess that means more fragility. The more surface area connecting blade to core, the less chance of breakage.
I donated an axe to nz larps at the last gear clean up day.
If someone who has access to the gear shed could post some photos of the head of it from the side and top, you can clearly see the construction details.
It looks very axe like and the head is reinforced with a 1" x 6" strip of canvas to stop it tearing off.
I’m not a big fan of many of the the commercially available axes. the heads are too cartoony for me. Some look fantastic but, for the most part, axe heads just weren’t that big.
Here is a very rough, quick and dirty sketch of how I construct axe heads:

- Construct a padded haft.
- Add a triangular blob of foam out the side to become the inside of the axe head.
- Glue a strip of canvas around the haft that extends across the ‘blob’ to reinforce it.
- Glue a piece of foam around the haft and ‘blob’ of foam and cut them all to shape.
- Shape edges with a sharp knife / sander so it looks like an axe.
Dane axes were often very slender light axe heads when compared to a modern wood cutting axe. You just don’t need that much mass on the end of an axe to be devastating, because kinetic energy is mass times velocity squared, i.e. an axe head going twice the speed hits four times as hard.
I think that’s slightly different to what I was suggesting.
I’d recommend attaching a foam “nub” for the head directly to the fibreglass core using tape (or your canvas-and-glue approach should be fine too), and then building the padded haft afterwards and build the head over the nub and the haft. The end result should look exactly the same, it’s just different underneath.
It sounds like you’re suggesting constructing a padded haft the whole length of the core, then building the head over it (starting with your “triangular blob” nub which is held on with the strip of canvas). I’ve tried that in the past, and the problem was that the glue holding the foam haft to the fibreglass core came loose where it lay under the head, alllowing the haft to rotate on the core (and the head with it). That’s why I’m suggesting attaching the nub directly to the fibreglass core using tape.
Of course, you may have gotten around this problem some other way. Perhaps your strip of canvas helps hold the haft foam to the core by applying pressure from the outside, although I don’t see how that would work. Or maybe the way you glued the haft foam to the core was more durable.
Inspired by this thread, I went out to the garage at midnight last night to make a sandwich, then carved it this afternoon. The result:
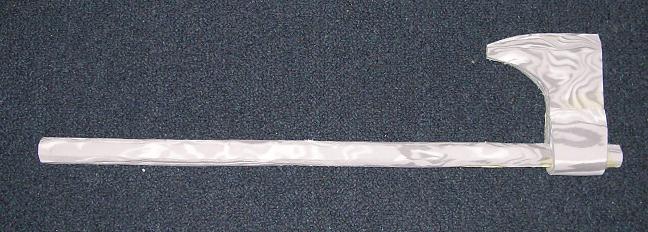
I followed Ryan’s advice, and taped (and glued) a large chunk of foam directly to the core. Then I built my sandwich around it, with the blade parts forming part of the sandwich (so the top and bottom layers were kindof L shaped, with a large irregularly shaped paddle extending out for the head. It was then carved to shape (5" blade, which is probably a bit big), cloth glued round the outside, then an extra cosmetic layer of foam to make it look like it has been socketed.
When it has dried fully, I’ll have to combat test it to see if it stands up.
Cool, looking good! If I can make a couple of suggestions without coming across like a dick 
The head looks very much like a modern axe for chopping firewood. It just says “axe” to me 
However, the haft looks like a round piece of dowel, or a piece if pipe. They’re mismatched.
Can I suggest you build up the front edge of the haft to look like a modern axe handle as well. Trust me, It’ll be worth the extra effort.
[quote=“Derek”]Cool, looking good! If I can make a couple of suggestions without coming across like a dick 
The head looks very much like a modern axe for chopping firewood. It just says “axe” to me 
However, the haft looks like a round piece of dowel, or a piece if pipe. They’re mismatched.
Can I suggest you build up the front edge of the haft to look like a modern axe handle as well. Trust me, It’ll be worth the extra effort.[/quote]
Well, the one I was modelling it off has a straight haft. But my head isn’t quite right - I went for a straight bottom rather than a curving one because it gave a good point of alignment for the sandwich and because it didn’t create a narrower, weaker point. OTOH, its not that far off - thefull bearded axe has one which is pretty similar (though that drops at the top)
(Anyone know where I can find the Petersen typology, BTW? It would help for further designs)
A straight handle will also make it easy to fit through a belt loop. Which wil be useful when I’m running through the forest being chased by medieval zombies.
how would i go about making a Baseball bat for zombie larp
