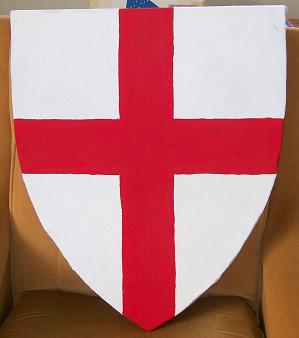
Nice! I do like good heraldry.
“azure a double headed eagle argent”

Nice! I do like good heraldry.
“azure a double headed eagle argent”
Its glued down as well, but you need something else to attach it (and to keep the folded hem down).
A staple isn’t a tremendous risk (especially since its on the back of the shield), but I’ll keep an eye on them and see if we lose any.
Next time (and once I’ve got some suitable brown paint to do it with).
Amphigori has an OHP. Scan the design from the book, print it, photocopy it on to transparency, and trace it.
Its actually “purpure, a double headed eagle or”, but the camera flash has distorted the colour.
The second one. This one was obviously much easier to do.
Here comes the Medic! 
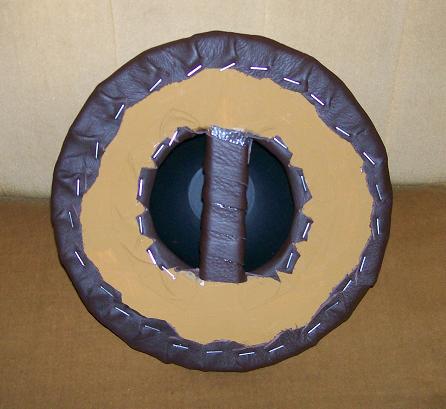
And the latest: a buckler, done as practice for a bigger Viking-style roundshield:
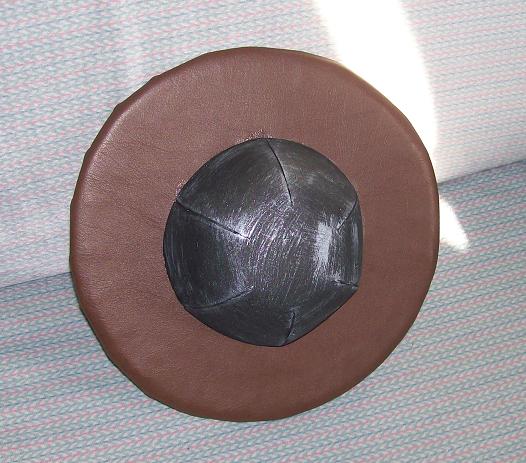
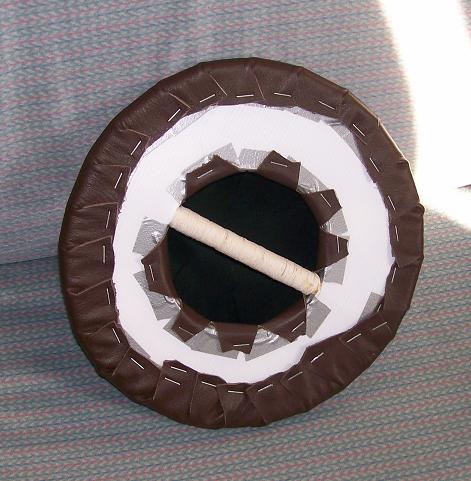
Its three layers of corflute, with a fibreglass rod sandwiched between then. The grip is foam and string. Its been edged in foam, with a boss using the pattern here. The cover is leather, held down with spray ADOS and staples. It could probably do with a flange round the base of the boss to hold it down, and if it fails its combat test, I’ll add one.
Looks good. Soft thin leather is a really good idea 
That’s looking really nice. Can I suggest covering the back in the same material and sewing it in place? Get some curved needles and some heavy thread from your local spotlight. They’re cheap and last for ages.
Buckler v2.0:
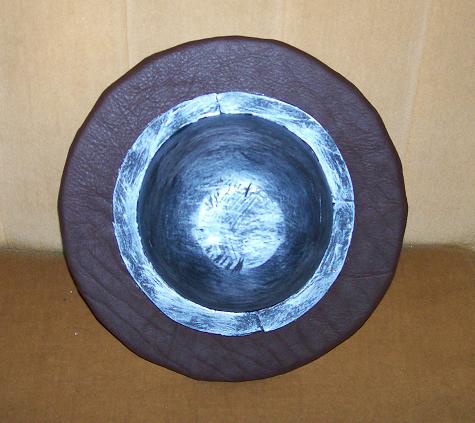
The grip is integral to the shield and wrapped. The boss is a 50 cent plastic bowl, with a rim of foam round it. It hasn’t been combat-tested yet, but if the all-foam boss held, then this should.
(The bad news is that I’m going to have to unpick all those lovely staples; in my rush to finish it to try it out, I forgot to edge it with foam. But there’s space to squeeze in a rim and restaple, I think).
The big lesson is that a wider grip requres a wider hole. Fortunately there’s room under the bowl for that. I also need to find an easy way of attaching it to a belt. Historic bucklers often have a metal tab or hook on the back for this, though they must have fallen off quite easily. Any suggestions?
They’re looking nice. 50c plastic bowls are a good solution
Can I suggest glue instead of staples? And a second piece of fabric / leather on the back to make it look pretty(er)?
[quote=“IdiotSavant”]Buckler v2.0:
The grip is integral to the shield and wrapped. The boss is a 50 cent plastic bowl, with a rim of foam round it. It hasn’t been combat-tested yet, but if the all-foam boss held, then this should.
(The bad news is that I’m going to have to unpick all those lovely staples; in my rush to finish it to try it out, I forgot to edge it with foam. But there’s space to squeeze in a rim and restaple, I think).
The big lesson is that a wider grip requres a wider hole. Fortunately there’s room under the bowl for that. I also need to find an easy way of attaching it to a belt. Historic bucklers often have a metal tab or hook on the back for this, though they must have fallen off quite easily. Any suggestions?[/quote]
There’s a “basic kit” thread well back on this forum which suggests it.
Glue might not be as solid; I’d actually prefer something like carpet tacks or drawing pins for an authentic look, but they might not be safe (and would come loose).
I’ll look at fabric when I scale up, since it will be cheaper than paint, and less effort.
if your going to add “rivets” to secure the plastic boss may i suggest leather working rivets (if the thickness of the plastic allows. there will be no sharp points embedded in the corflute and it will be just as secure, gluing for extra hold would probably be wise in combination.
Just a thought
I was thinking of “rivets” (or rather “nails”) for the leather cover; the boss itself doesn’t have anything to rivet to, since its a lipless bowl.
But one of the alternatives would be car red noses, which do have a lip on them, which could be glued and “riveted” to the front of the shield.
[quote=“Ryan Paddy”]In terms of looks, I’d favour not having the back be white. The back of shields often seem to feature in photos. Could be painted.
[/quote]
Yeah, good tip there. A great many people don’t bother doing anything to the back of the shield and it really ruins it. Theres nothing worse than see Barfoot & Thompsen or Ray White flashing around.
I find a good thing to use as a primer is ADOS. Either spray or wipe on. Let it dry and its a fine paint surface. It can also be used to give some nice texture.
Haven’t tried ADOS yet, but a layer of latex works OK. I wouldn’t use it on the front of the shield because it will get damaged, but it should be OK on the back of the shield.
So, what’s the best way to waterproof the paint on the back so it doesn’t run? Any useful spray I can use?
(Currently doing a 60cm Frankish roundshield)
As long as you’re using acrylic paint and not poster paint it shouldn’t run in the rain once it’s dried.
They’re labelled arcrylic (“Derivan student arcrylic”), but past experience indicates a problem.
I would use polyurethane, but that’s because I have some around for using on the house. You can get water based polyurethane these days, makes it easier to wash the brushes, and doesn’t go yellow with age.
Where can I get this useful substance? Mitre 10?