Helmets

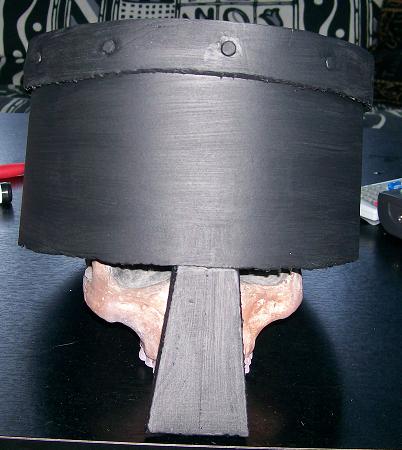
I’d recommend using grey or black foam for making armour. Almost inevitably whatever coating you use will deteriorate, and you’ll see the foam colour coming through - which is not nice if it’s green, blue or yellow. Also, it’s nice if you can leave the inside unpainted, so that colour doesn’t rub off on your head, and that works best if the inside is already grey.

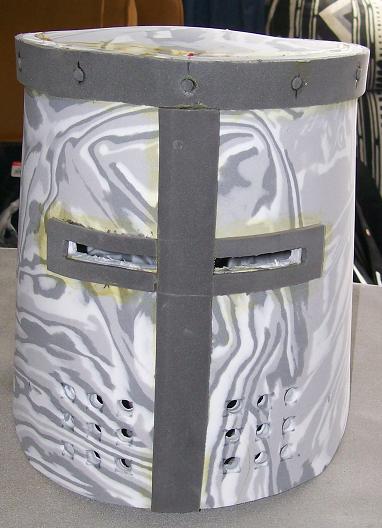
I found that gluing thin pieces of foam to the helm to give detail makes it a lot more believable-looking. For example, the rim at the top of the model you’re working from, and the studs, could be done in foam.

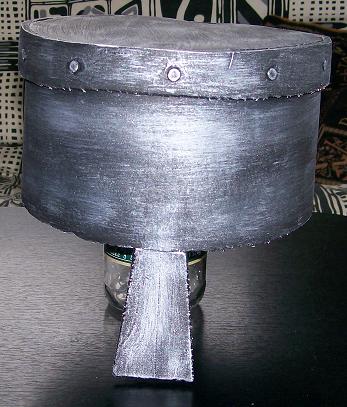
I’ve used black paint as an undercoat, then dry-brushed in silver. The undercoat doesn’t have to be spray paint, regular paint with a brush works just as well and spray-paint is relatively wasteful and messy. This one is just black paint with silver dry-brush: picasaweb.google.com/eagle14/StW … 1640796674

You could latex it, and it may give a smoother and more durable finish, but it isn’t absolutely necessary. Another alternative is to spray it with car underbody sealer for the undercoat, which gives a finish resembling latex. I’ve seen this done well (and it’s apparently what they did for armour on Hercules and Xena), but I haven’t had much luck with it and found that the coating tended to colour things it touched. I found just using paint much less hassle than sealer or latex.

Spangenhelms are relatively easy to make, using four curved triangular pieces of foam for the main shape (which is exactly how it was made in metal). I think Derek posted a pattern for one somewhere on the forum. Foam is easy stuff to work with, 3D curves are quite achievable with good templates. Also, mild heating of the foam allows for pretty much any shape to be made by pressing it against a former, although I haven’t needed to use that technique yet.

I’d figured. I’m using leftovers at the moment, and I have (mottled) grey once I work out what I’m doing.

I was thinking of this too, though I’ve also seen helms of this type rimmed in leather (and I just had 5 kg of assorted bits arrive by courier this morning. I love TradeMe).

Pretty. Do you have a pattern for that one? (though it looks like its in three pieces - top, bottom, and lid).

I’ll give that a go sometime. Always good to have a spangenhelm or two…

I didn’t use a pattern, I just fitted it to myself as I went. It’s two pieces, one for the sides and one for the top.

For the sides I got a piece of foam, wrapped it around my head for size (err on the large size, because you can always cut it down), cut it to the marks, tried it on again and adjusted the fit to make it bell outwards slightly, glued it to itself down the back to make a slightly conical tube.

For the top, I made an oval of foam the same shape as the top of the “sides” tube. Then glued it on top. The top piece helps keep the sides a more oval shape in cross section, normally it would tend to be more circular.

I could make a pattern from the finished helmet and mail it to you, but the size may need adjusting for the wearer. Mine’s a tight fit with no padding.

It’s a bitch to fight in, the visibility is poor and it has a tendency to turn sideways on my head obscuring vision completely. The downside of a lack of strapping, and of foam being so flexible. :slight_smile:

Also, my one is a fairly early straight-sided great helm, which I thought was suited to the period of Wolfgangs. Later great helms had a more conical top section, then a more straight-down bottom section, like this:

The approach I used could probably be adjusted to achieve this just by adding an angle to the line of the seam down the back.

I’d love to hear from painters how to get that degree of metal shine with paint.

If you want to add a bit of rigidity, you can glue a layer of cloth - calico would work well - to the underside once you’ve made it to shape. Basically you soak the cloth in the glue (coat the inside as well) and lay it on, then smooth it down with something firm that will scrape away the over-excess glue, bearing in mind that the aim is for the cloth to remain fairly soaked. Once it’s dried you should find the whole thing a lot more resilient while still being light and comfy.

It’s the same thing they do to make body armour for the likes of Power Rangers and Starship Troopers, so Moo would probably be someone to talk to very, very nicely about it.

Actually, same probably goes for your painting, Ryan :slight_smile:

[quote=“Ryan Paddy”]Also, my one is a fairly early straight-sided great helm, which I thought was suited to the period of Wolfgangs. Later great helms had a more conical top section, then a more straight-down bottom section, like this:

The approach I used could probably be adjusted to achieve this just by adding an angle to the line of the seam down the back.[/quote]

Or do it in three pieces. Though the metal ones are made in five: arador.com/construction/greathelm.html

Guess I’ll need to get a punch if I want to do fake rivets (I already have some thinner foam for details, thogh I haven’t tried any yet).

Could do, but probably not necessary for the shape, and it’s more gluing.

It might be a plan to make holes in the “detail” strips, and glue the “rivets” into these holes. If they’re just glued to the surface of the foam, they’ll probably come off during use.

Another approach would be to cast the details in latex, rivets included, and then glue them on. The good thing about casting is that you can get any shape you want. Also handy if you want to make several of the same thing, as you can re-use the mould. For that matter, a mould could be made for the whole helmet’s surface, which could then be cast in latex and glued to the foam base - a good approach if you wanted something really detailed. This is the approach that Bryn and Norman took to their “wooden” shields.

I haven’t been able to find the pattern for a foam Spangenhelm, but trawling the Gear forum turned up a pattern for a foam hoplite helm. There’s also the shield boss pattern which can be adapted for things like kettle hats.

Real spangenhelm patterns (for metal) can be found here, and should be easy to adapt.

[quote=“Ryan Paddy”]

I’d love to hear from painters how to get that degree of metal shine with paint.[/quote]

Gilding wax.
Expensive, but it works really well. I’ve never tried it on EVA before, but we do spraypaint our urethane first, so I’m relatively confident it would work in a similar way if you coated the EVA first. Always start with a base layer of black and work your merry way up from there.

If you have access to a power sander (belt sander, angle grinder with sanding disk etc) you can use it to shape and tidy up the foam before painting.

I took a go at it with sandpaper, but next time I will be using a sharper knife.

Fake rivets added with aid of craft punch and soldering iron. Gluing them in was a messy job. Its now been given its first coat of paint and is drying in the garage.

Painted black, with details. The rim is 5mm grey foam, the “rivets” made by cutting a small section of that in half to make it thinner so it will fit in a craft punch, inset slightly into holes made with a soldering iron. Gluing them in is very fiddly.

Next: learn to drybrush with a big brush.

Looking good. I don’t find sandpaper without a power tool works. It grips too much. Sandpaper on a power tool is good though.

When cutting foam edges that will visible, I find that using a new, sharp blade and cutting with a long drawing action rather than a short sawing action gives a clean edge. I haven’t needed to sand edges.

That’s definitely my plan for next time, now that I have fresh blades.

I think my drybrushing technique needs work, but it’ll pass the 10 foot test, which is what matters.

And having just played with a fresh blade while cutting out the block for a basic dagger, it really does make a difference.

After a disastrous attempt at making a spangenhelm (I used 4 curved triangles and ended up with something that was squareish at the base), I decided to try something simpler: a crusader-style geat helm, similar to the one pictured earlier in the thread. Here’s how it looks pre-paint:

The top is an ellipse, with a barrel of foam wrapped around it. As you can probably guess from the doming and slightly warped sides, my construction technique needs a little work. The breathing holes (which are probably too low) were made with a metal pen barrel, which you just press and twist into the foam.

I haven’t tried fighting in it yet, but I expect it will be hot and restrictive. Still, its a cool prop, and useful to have around.

cool - love it

Something to note, fresh sharp craft knives are sharp!
Sounds obvious, but I managed to cut my finger kinda badly early feb and after getting my finger bandaided up, passed out. Lost a fair amount of blood, hadn’t eaten much that day and I’m not a big guy.
Been banned from doing modeling at home alone now by flatmates for fear of being dumb and doing it again.

for shapeing things I remember a few pieces of “trollball” armour made up for AMERICA years ago now, that was flat foam heated, curved and then had fingers poked into it while still hot, giving it large metal studs… then black paint with silver studs, elastic to hot it in place and you have great orkish looking shoulders.
While not totally on topic for helms for a more fantasy look you could do similar or as suggested heat the foam and press into a mould of some form.
Prehaps have an authentic looking helm with an addon that’s makes it look OTT and fantasy.
ohh Omni armour…

This is why I think people should have one hit point. :wink: